
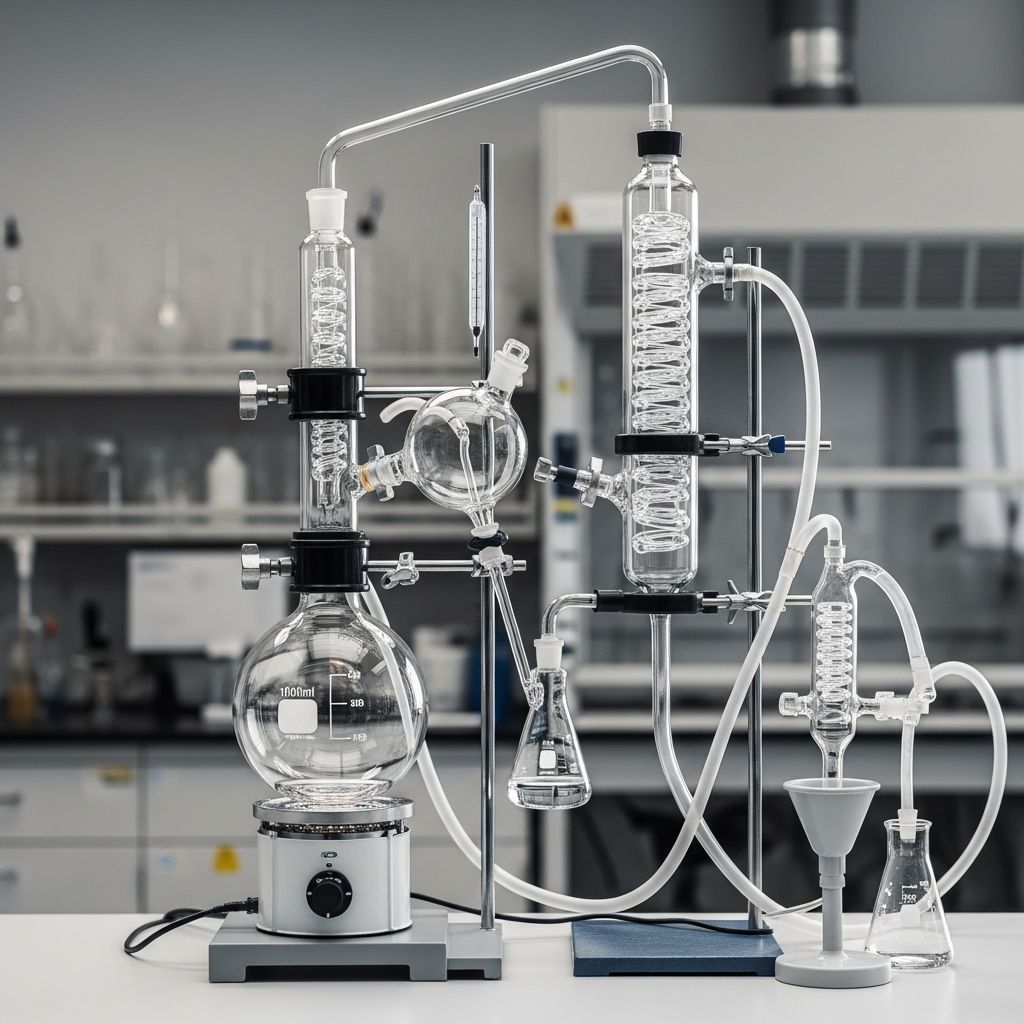
Distillation remains a cornerstone technique in chemistry laboratories for separating liquid mixtures based on differences in boiling points. Properly assembling the apparatus is crucial for safety, efficiency, and accurate results. This guide provides a detailed, original walkthrough inspired by established lab practices, covering everything from basic components to advanced configurations.
Understanding the Fundamentals of Distillation
At its core, distillation exploits the varying volatilities of components in a mixture. When heated, the more volatile substance vaporizes first, travels through the apparatus, cools, and condenses into a purer form, while less volatile components remain in the original flask. This process is vital for purifying solvents, isolating essential oils, or analyzing unknowns in organic chemistry.
Key principles include vapor pressure, where liquids with lower boiling points produce vapor at lower temperatures, and Raoult’s Law, which predicts ideal mixture behavior. Real-world setups account for azeotropes—mixtures that resist further separation—and require adjustments like fractional columns for complex blends.
Essential Components for a Basic Setup
A standard distillation apparatus comprises several interconnected glassware pieces, each with a specific role. Here’s a breakdown:
- Round-bottom flask (distilling flask): Holds the mixture; its shape ensures even heating and prevents superheating.
- Heating source: Heating mantle, hot plate, or oil bath provides controlled heat.
- Three-way adapter (Y-adapter or still head): Connects flask, condenser, and thermometer; directs vapor flow.
- Liebig or Allihn condenser: Cools vapor back to liquid using circulating water.
- Vacuum adapter or distillation head: Directs distillate to receiver; optional for vacuum setups.
- Receiving flask: Collects purified liquid; Erlenmeyer or round-bottom options available.
- Clamps and stands: Ring stands, three-prong clamps, and Keck clips secure everything.
- Thermometer and adapter: Monitors vapor temperature for boiling point identification.
- Boiling chips or stir bar: Prevents bumping by promoting even nucleation.
These items form the backbone of simple distillation, scalable for fractional or vacuum variants.
Step-by-Step Assembly Guide
Assembling the apparatus demands precision to avoid leaks, breakage, or instability. Follow these steps meticulously in a well-ventilated fume hood.
- Prepare the stand: Position two ring stands side-by-side. Attach a ring clamp low on one to support the heating mantle, and a three-prong clamp higher for the flask.
- Secure the distilling flask: Clamp the round-bottom flask firmly at its neck using the three-prong clamp. Fill it 1/3 to 1/2 full with sample to allow vapor expansion space.
- Add boiling aids: Drop in 2-3 boiling chips or a magnetic stir bar via a stemmed funnel to prevent violent boiling.
- Attach the Y-adapter: Seat it greased joint-down onto the flask; secure later with a Keck clip.
- Mount the condenser: Clamp it vertically to the second ring stand using a versatile clamp. Connect it to the Y-adapter with a Keck clip, ensuring joints align perfectly.
- Install vacuum adapter: Link it to the condenser’s lower end with another clip; position a receiving flask beneath.
- Position thermometer: Insert into a thermometer adapter on the Y-adapter’s side arm. Bulb should sit just below where vapors enter the condenser for accurate readings.
- Connect cooling water: Use Tygon tubing: inlet to lower condenser nipple (from faucet), outlet to upper (to drain). Water flows uphill to prevent backflow.
- Place heating mantle: Set under flask on ring clamp; ensure stability before powering on.
Test all joints for tightness by gently tugging. Adjust heights so apparatus is vertical and balanced.
Safety Protocols and Best Practices
Laboratory distillation involves heat, glass, and potentially hazardous chemicals, so prioritize safety:
- Wear PPE: Gloves, goggles, lab coat; use fume hood for volatiles.
- Secure all glassware: Double-check clamps to prevent falls.
- Heat gradually: Ramp up to avoid cracking flask or bumping.
- Monitor water flow: Ensure condenser doesn’t overheat.
- Emergency readiness: Keep quench (sand/water bucket) nearby; know fire extinguisher location.
- Avoid ethanol/methanol near flames: Use electric heat sources.
Common errors include improper thermometer placement (reads ambient, not vapor temp) or overfilling flask (causes overflow).
Advanced Configurations: Fractional and Vacuum Distillation
For mixtures with close boiling points, upgrade to fractional distillation by inserting a fractionating column between flask and adapter. Packed with Raschig rings or wire gauze, it provides multiple vaporization-condensation cycles for better separation.
Vacuum distillation suits heat-sensitive compounds:
| Aspect | Simple Distillation | Vacuum Distillation |
|---|---|---|
| Pressure | Atmospheric | Reduced (10-100 mmHg) |
| Boiling Point | Normal | Lowered |
| Receiver | Erlenmeyer | Clamped round-bottom |
| Adapter | Standard | Vacuum takeoff |
| Use Case | Wide BP difference | High BP/heat-sensitive |
Attach a vacuum pump to the adapter’s side arm, grease joints heavily, and use a manometer for pressure monitoring.
Troubleshooting Common Issues
Even experts encounter problems. Here’s how to diagnose and fix:
- No distillation: Check heat source, boiling chips, or clogs; ensure flask isn’t overfilled.
- Low yield: Verify condenser water flow; reposition thermometer.
- Cracked glass: Thermal shock—heat slowly, use even mantles.
- Vapor leaks: Re-grease joints, tighten clips.
- Bumping: Add more chips or use stirring.
Monitor distillate temperature plateaus, indicating pure fractions.
Practical Applications in Modern Labs
Distillation setups purify water, recover solvents, or extract natural products. In pharmaceuticals, vacuum variants distill active ingredients without degradation. Educational labs teach phase changes and purification metrics like refractive index checks post-distillation.
Optimize by collecting fractions: Discard foreshots (low boilers), heart (pure product), and tails (high boilers). Yield calculations: (distillate mass / initial mass) × 100%.
Frequently Asked Questions (FAQs)
What is the ideal fill level for the distilling flask?
Fill to 1/3-1/2 capacity to allow headspace for vapors and prevent boil-over.
How should condenser water flow?
Inlet at bottom, outlet at top, ensuring full submersion and efficient cooling.
Can I use a hot plate instead of a heating mantle?
Yes, but place flask in sand bath for even heat distribution and safety.
Why add boiling chips?
They create nucleation sites, preventing superheating and explosive boiling.
What’s the correct thermometer position?
Bulb just below the Y-adapter’s condenser arm, measuring true vapor temperature.
Maintenance and Cleanup
Disassemble while warm to ease cleaning. Rinse with acetone or soap; dry inverted. Store greased joints capped. Inspect for chips/cracks before reuse.
For longevity, handle with padded tongs and avoid rapid cooling.
References
- How To Set Up a Distillation Apparatus — USA Lab. 2023-05-15. https://www.usalab.com/blog/how-to-set-up-a-distillation-apparatus/
- Distillation Set-Up — Organic Chemistry at CU Boulder. 2022-08-10. https://www.orgchemboulder.com/Technique/Procedures/Distillation/Setup.shtml
- 5.2C: Step-by-Step Procedures — Chemistry LibreTexts (Nichols). 2024-01-22. https://chem.libretexts.org/Bookshelves/Organic_Chemistry/Organic_Chemistry_Lab_Techniques_(Nichols)/05:_Distillation/5.02:_Simple_Distillation/5.2C:_Step-by-Step_Procedures

- Integrated M.A. in Applied Linguistics, University of Hyderabad
- 5+ years in editorial, instructional, SEO, and research-based writing
Sneha is a relationships and lifestyle writer with a strong foundation in applied linguistics and certified training in relationship coaching. She brings over five years of writing experience to theskillvault, crafting thoughtful, research-driven content that empowers readers to build healthier relationships, boost emotional well-being, and embrace holistic living. Her writing and insights reflect the belief that beauty, happiness, and wellness…